🔦 Why Visibility Gear Matters More in Coastal Cities
Every rider deserves to feel safe, visible, and in control. With the right visibility gear for e-bike riders, your coastal commute becomes not just safer—but smarter, and even inspiring. Especially when riding through coastal cities, where unique environmental factors make visibility a daily challenge. Think fog that clings to your path, sudden gusts of sea wind, glistening pavement from humid nights, and a glowing haze that confuses drivers’ vision. In these conditions, your visibility gear is your only real voice on the road.
Whether you’re commuting after sunset or navigating the early morning mist, having the right visibility equipment doesn’t just improve safety—it defines it. It’s the difference between being noticed at 40 meters or only at 4. And that difference could save your life.
🌫️ Coastal Cities and the Visibility Problem
While city riders inland might rely on predictable lighting and clear air, coastal commuters often ride in low-contrast conditions. Moisture in the air softens lighting and reflects it in unexpected ways. Sea spray settles on lenses, fog dims LED lights, and condensation inside a poorly sealed light can render it useless when you need it most.
- 🌀 Humidity reduces visibility range even with strong lights
- 💧 Wet roads reflect glare, making riders harder to spot
- 🌫️ Salt fog corrodes lights and dulls reflectors over time
In coastal settings like San Diego, Valparaíso, or Cartagena, visibility drops dramatically at night—even when riding near lit areas. That’s why visibility gear isn’t a suggestion. It’s non-negotiable.
🛡️ Visibility Gear = Control Over Risk
Too many e-bike riders assume that a basic front light is enough. But in coastal cities, you need to think beyond “enough.” You need to ask: Can I be seen from the side? From behind? In the fog? In the rain?
Proper visibility gear includes:
- ✔ Bright, waterproof front lights (600+ lumens)
- ✔ Dual rear lights with blinking modes
- ✔ Side visibility—via spoke lights or reflective rims
- ✔ Reflective clothing, vests, or tape on all moving parts
- ✔ Bright colors that contrast with fog or rain
Each layer of visibility adds redundancy. If one fails, the others still keep you visible. That’s how professionals think about risk—and that’s how e-bike riders in coastal cities should think too.
🧠 Real Story: Vanessa’s Fog Ride in Porto
Vanessa, a coastal designer from Porto, rode home one foggy night with her usual setup: one front light and a dark rain jacket. A car swerved too close, braking at the last second. “I realized I was invisible except for one dim glow,” she says. The next day, she added a reflective vest, spoke lights, and flashing ankle bands. “I don’t just ride safer—I ride more confidently.”
“In a city where the air glows and streets reflect the sea, your visibility isn’t just gear—it’s your guardian.” 🌊🚴♀️💛
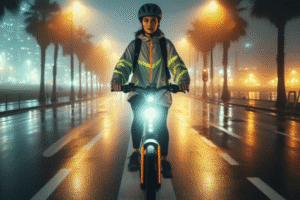
🔦 Front, Rear, and Side Lights: Your First Layer of Coastal Visibility
Lights are the foundation of every e-bike visibility system. But not all lights are created equal—especially when you’re navigating through coastal cities at night. From the ocean mist of Lima to the salty winds of Barcelona, your lights must do more than just “exist.” They must perform under pressure: fog, moisture, wind, salt, and reflection.
💡 Front Lights: Seeing and Being Seen
The front light of your e-bike isn’t just for lighting the path—it’s a signal to everyone ahead that you’re coming. In coastal cities, it’s your first line of communication with traffic, pedestrians, and even other cyclists.
- ✔ Minimum recommended brightness: 600 lumens
- ✔ Beam angle: Wide (90° or more) to increase peripheral coverage
- ✔ Waterproof rating: IPX6 or higher (resists sea spray and rain)
- ✔ Mount stability: Metal clamp or hard-mount (elastic straps fail in wind)
Bonus: Some front lights include high-beam modes for dark streets and a flashing function for increased visibility at intersections.
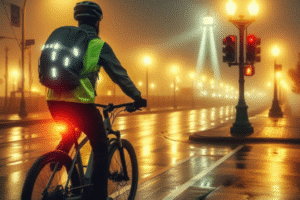
🔴 Rear Lights: Your Coastal Brake Lights
Rear lights signal your presence to vehicles and riders behind you. On wet roads, with reflections bouncing everywhere, your back is your most vulnerable angle. One light isn’t enough—you need redundancy.
- ✔ Use at least two rear lights: one on the seatpost, one on your backpack or helmet
- ✔ Choose lights with steady + flashing combo modes
- ✔ Recharge weekly and clean lenses after each foggy ride
A well-placed rear light should be visible from 50–100 meters behind you—even through rain and fog glare.
🌟 Side Lights: The Forgotten Angle
Many e-bike riders ignore side visibility, but it’s often the cause of intersection crashes and side-swipes—especially in coastal environments where ambient light is diffused and fog masks side silhouettes.
How to improve side visibility:
- ✔ Install spoke lights (LEDs that attach to wheel spokes)
- ✔ Use rim reflectors or sidewall reflective tires
- ✔ Add small LED strips to the sides of your frame
In dense fog or low-sodium light zones (common near piers and ports), side lights give you lateral presence that even streetlights can’t replace.
🧠 Real Story: Leila’s Light Fix in Viña del Mar
Leila, a student in Viña del Mar, had a near-miss when a car turned out of a side street and clipped her pedal. “He didn’t see me from the side,” she said. Since then, she added spoke lights and reflective rim strips. “Now when I pass intersections, I look like a galaxy in motion. And I feel safe.”
📉 Lighting Setup Mistakes to Avoid
- 🚫 One weak front light = poor recognition at distance
- 🚫 Only one rear light = dangerous blind spot
- 🚫 No side lights = invisible during cross-traffic turns
- 🚫 Loose mounts = light misalignment during vibration
“Your lights aren’t decorations. They’re declarations. Make them loud.” 🌙🚴♀️✨
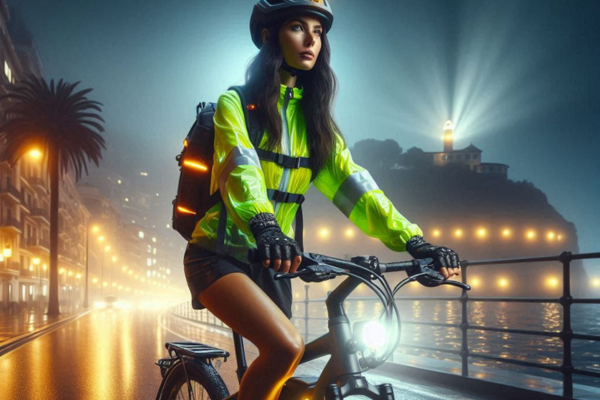
🧥 Wearable Visibility: Turning Your Body into a Moving Signal
Lights are essential, but so is what you wear. In fact, your clothing and gear can often do what lights can’t: show motion, offer 360° reflection, and remain visible even when batteries die. In coastal environments where rain and fog mute streetlamps and headlights, your personal visibility gear becomes your moving canvas.
🌈 Mistake-Proof Colors and Fabrics
Dark clothing absorbs light and makes you blend into the environment—especially on foggy or rainy nights. Even in well-lit areas, dark clothes can make you appear as a silhouette rather than a person.
- ✔ Wear neon colors: lime green, safety orange, electric yellow
- ✔ Look for jackets with reflective tape or piping
- ✔ Choose water-resistant materials to avoid losing visibility in wet conditions
Reflective materials that catch headlights from any angle are a rider’s best friend near coastal roads, where mist distorts direct light.
👟 Motion = Visibility: Ankle, Wrist, and Knee Reflectors
Your legs and arms are in constant motion while riding—that’s why reflectors on joints and extremities make you more noticeable. Moving light is more attention-grabbing than static light, especially for drivers.
- ✔ Use LED ankle bands or reflective tape on pant cuffs
- ✔ Wear reflective gloves—especially helpful when signaling turns
- ✔ Add reflective details to knees or outer thighs (vests with lower body reflectors work well)
Bonus: LED slap bands or armbands offer both reflection and motion visibility, and they’re easy to wear over jackets.
🎒 Backpacks: The Visibility You Might Be Blocking
Many riders wear high-visibility jackets, then cover them with a solid-colored backpack—accidentally hiding their best visibility gear. But your backpack can be part of the solution too.
- ✔ Choose backpacks with built-in reflective panels
- ✔ Add clip-on LED lights to zippers or side straps
- ✔ Attach reflective tape to the back and sides of your bag
Your back is the most visible surface to cars behind you—make sure it works for your safety, not against it.
🧠 Real Story: Sara’s Visibility Overhaul in Valparaíso
Sara, a barista in Valparaíso, used to commute in black yoga pants and a dark hoodie. After a rainy night when a delivery van passed dangerously close, she changed her setup. “I bought a neon yellow vest with reflectors, wrist lights, and swapped my backpack for one with a glowing outline,” she shares. “Now I look like a moving beacon—and I get home without scares.”
📉 Common Wearable Mistakes
- 🚫 Wearing dark or muted clothing during low-light conditions
- 🚫 Using backpacks that cover reflective jackets
- 🚫 Ignoring ankles, wrists, or knees as visibility points
- 🚫 Forgetting that motion-based reflection is your best friend in traffic
“Your body is part of your visibility system—dress like your life depends on it. Because it does.” 💛🚴♀️🦺
🛠️ Maintaining and Testing Your Visibility Gear Like a Pro
Buying great visibility gear is only half the journey—the other half is making sure it works when you need it. Coastal environments bring extra challenges: salty air, persistent humidity, fog buildup, and shifting lighting conditions. Without proper maintenance, even the best lights and reflectors lose their power fast.
🧪 Test Before Every Ride
Just like you wouldn’t leave home without checking your battery, checking your visibility gear should become a daily habit. It only takes one failed light to put you at risk in dense traffic or a dark intersection.
- ✔ Turn on all your lights before leaving: front, rear, and side
- ✔ Check reflectors by shining a light on yourself in low-light indoors
- ✔ Ask someone to observe you from 10 meters away—can they see all angles?
Bonus: Take a picture of yourself in full gear using flash. If you’re not glowing from multiple directions, you’re not ready.
🧼 Clean Gear = Visible Gear
Salt, fog, and pollution create an invisible film over lights and reflective surfaces. You may not notice it until you’re in the dark—and by then, it’s too late. A quick post-ride wipe makes a huge difference.
- ✔ Wipe lenses and reflectors with a damp microfiber cloth
- ✔ Use mild soap to clean straps, jackets, and reflective fabric
- ✔ Dry all components fully before storage to avoid rust or mildew
Every clean surface improves light transmission and reflection. Visibility is clarity—and clarity is life.
🔗 Combine for 360° Coverage
No single piece of gear can protect you from every angle. That’s why layering your visibility equipment is critical. Think in zones: front, back, sides, and motion points (ankles, wrists, helmet).
- ✔ Combine front light + reflective jacket for forward presence
- ✔ Use dual rear lights + reflective backpack for back coverage
- ✔ Add spoke lights + reflective strips for side awareness
- ✔ Highlight moving parts (wrists, knees, ankles) with LED bands or reflective gear
If one item fails, the others compensate. That’s how to build reliability into your visibility strategy.
🧠 Real Story: Nerea’s Layered Defense in Cádiz
Nerea, a software analyst from Cádiz, started with just a strong front light. “I thought that was enough,” she said, “until I got almost sideswiped by a car coming out of a foggy alley.” Now, she layers a neon vest, flashing rear light, spoke LEDs, and reflective ankle wraps. “I test them all before every ride. I’m not taking chances anymore.”
📉 Common Maintenance Mistakes
- 🚫 Assuming gear “still works” without testing
- 🚫 Ignoring salt and fog residue on lenses and tape
- 🚫 Relying on a single light for all visibility needs
- 🚫 Storing wet gear = fast wear and reflective degradation
“Visibility isn’t static—it’s something you build and preserve, every ride, every night.” 🌊🔧🚴♀️
✅ The Ultimate Visibility Gear Checklist for Coastal E-Bike Riders
You’ve learned the principles, the gear, the strategy—and now it’s time to put it all together. This final checklist will help you assess your setup, improve weak points, and ride with confidence no matter the conditions.
📋 Must-Have Visibility Gear
- ✔ 600+ lumen waterproof front light (wide beam)
- ✔ Dual rear lights: seatpost + helmet or backpack
- ✔ Side visibility: spoke LEDs, reflective tires, or side frame tape
- ✔ Reflective jacket or vest with neon color contrast
- ✔ Reflective ankle bands and wrist bands for motion visibility
- ✔ Reflective tape on helmet, backpack, and panniers
- ✔ Backpack with LED clips or integrated reflectors
- ✔ Clear, consistent hand signals with reflective gloves
📉 Avoid These Visibility Mistakes
- 🚫 Relying on a single light or just reflectors
- 🚫 Wearing dark clothing during foggy or rainy conditions
- 🚫 Skipping gear checks before your ride
- 🚫 Blocking your jacket with an unreflective backpack
- 🚫 Ignoring side and motion-based visibility
🧠 Real Story: Elena’s Glow-Up in Mazatlán
Elena, an architect in Mazatlán, used to ride at night with a basic setup: one front light and a grey hoodie. After a near-collision with a distracted driver, she went all in. “Now I glow,” she laughs. “Front light, ankle bands, neon vest, and spoke lights. I feel like a mobile lighthouse—and I ride with pride.”
❓ Frequently Asked Questions (FAQs)
1. What’s the most important piece of visibility gear?
There isn’t one. You need a system: front + back + sides + motion. A reflective vest alone isn’t enough, and neither is a single light.
2. Can I use my bike’s stock lights?
You can—but most stock lights are underpowered and not built for foggy or coastal environments. Upgrade for brightness and waterproofing.
3. How do I make my backpack safer?
Add reflective stickers, clip-on LEDs, or choose one with built-in reflective elements. Never let your bag block your jacket’s visibility.
4. What’s the cheapest way to improve visibility?
Reflective tape. It’s affordable, flexible, and can go on almost anything: your frame, helmet, bag, shoes, and pedals.
5. Is visibility still important during daylight?
Absolutely. Fog, cloud cover, and shaded coastal paths can all reduce visibility during the day. Ride visibly 24/7.
💛 Final Thoughts: Be Seen, Be Safe, Be Proud
Riding through a coastal city at night can be magical—but it should never be dangerous. Visibility isn’t just about gear. It’s about presence, power, and preparation. Every reflective strip, every blinking light, every signal you give says: “I’m here. I belong. I matter.”
“You don’t need to be loud to be seen. Just prepared, visible, and radiant.” 🌟🚴♀️💛
📣 Join the Conversation
Do you have a favorite visibility trick, accessory, or outfit that’s made a difference in your rides? Share it with our coastal rider community in the comments—or tag us in your night ride setup photos. Let’s light the way together.
Also read: Night Riding on E-Bikes: Safety Tactics for Coastal City Commuters